Custom Components
How to build your custom component
What you will build
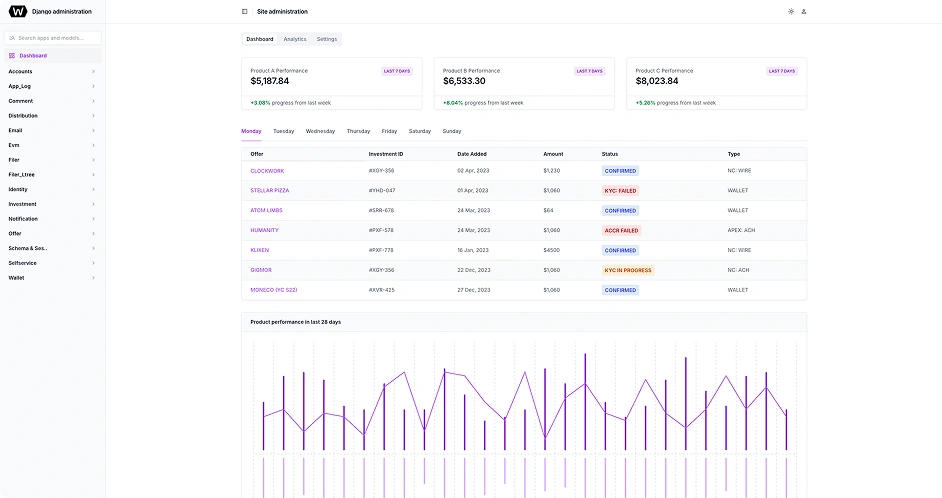
A standalone Vue component surface with dashboard and investor workflows, UI-ready models, shadcn-vue primitives, and ViewModels that own loading, search, filters, and view toggles.
What to change first
Start with src/app/models and src/app/mock. Shape the display data your component needs before touching routes, layout, or visual components.
Where the SDK fits
Keep Torque SDK/API calls behind a service module. The example mockAdminService.ts file is the boundary you replace when connecting live platform data.
How To Use The Example Repository
Use the public repo as a working starter. Keep visual components simple, put interaction state in ViewModels, and treat mockAdminService.ts as the boundary you later replace with Global Torque SDK/API calls.
- Clone the starter Run the repo locally before changing it so you can compare your component against a known working baseline.
- Model the display state Create UI-ready models first. Components should receive strings, arrays, labels, and tones that are already ready to render.
- Keep behavior in ViewModels Search, filters, loading, errors, refresh actions, and view-mode toggles belong in composables rather than route templates.
- Connect Torque last Once the UI is clear, replace the mock service with Global Torque SDK/API calls without rewriting the visual components.
Build A Custom UI Component
Use the public example as a practical starter for a custom Global Torque UI component. Build the screen with mock, UI-ready data first, keep interaction behavior in ViewModels, then connect live SDK/API data behind the service boundary.
Step 1
Clone the public starter
Start from global-torque/ui-component-example and make your changes in a local copy. The repo is intentionally small, so the important folders are easy to see: models, mock data, ViewModels, components, and routes.
git clone https://github.com/global-torque/ui-component-example.gitcd ui-component-exampleStep 2
Install dependencies and check the baseline
Use Node 24 and pnpm 10.33 or newer. Install packages first, then run the fast local checks so you know the starter is healthy before adding custom behavior.
corepack enablepnpm installpnpm run typecheckpnpm run test:runStep 3
Run the project and inspect the routes
Start the Vite dev server and open both example routes. The dashboard route shows the overview component surface; the investors route shows search, filters, table mode, and pipeline mode.
pnpm run dev# Open the starter routes:# http://127.0.0.1:5173/dashboard# http://127.0.0.1:5173/dashboard/investors# Run the full verification flow before publishing changes:pnpm run verifyStep 4
Add real API calls with MVVM boundaries
When you connect live data, do not call the SDK from Vue templates. Put SDK/API reads in a data service or adapter, normalize responses into the same UI-ready models, and let the ViewModel call that service.
// src/app/data/torqueAdminService.tsimport type { DashboardMockModel, InvestorsMockModel } from '../models';const API_BASE_URL = import.meta.env.VITE_TORQUE_API_URL;interface TorqueAdminClient { getDashboard(): Promise<unknown>; getInvestors(): Promise<unknown>;}async function readJson(path: string): Promise<unknown> { const response = await fetch(API_BASE_URL + path, { credentials: 'include', }); if (!response.ok) { throw new Error('Torque API request failed.'); } return response.json();}function toDashboardModel(payload: unknown): DashboardMockModel { // Normalize SDK/API payloads into the same UI-ready model // your mock dashboard already returns. return payload as DashboardMockModel;}function toInvestorsModel(payload: unknown): InvestorsMockModel { // Keep response wrappers, snake_case aliases, dates, and // currency formatting out of Vue components. return payload as InvestorsMockModel;}export function createTorqueAdminService(client: TorqueAdminClient) { return { async getDashboard(): Promise<DashboardMockModel> { return toDashboardModel(await client.getDashboard()); }, async getInvestors(): Promise<InvestorsMockModel> { return toInvestorsModel(await client.getInvestors()); }, };}export const adminService = createTorqueAdminService({ getDashboard: () => readJson('/dashboard'), getInvestors: () => readJson('/investors'),});// If you use the Global Torque SDK directly, replace readJson()// with your configured SDK client methods here.Step 5
Move screen behavior into a ViewModel
Search, filters, loading, errors, refresh, and view-mode toggles belong in a composable. The ViewModel owns orchestration; the route binds to state and commands.
// src/app/view-models/useInvestorsViewModel.tsimport { computed, ref } from 'vue';import { adminService } from '../data/torqueAdminService';type InvestorViewMode = 'table' | 'pipeline';const ALL_STATUSES = 'All statuses';const ALL_FUNDS = 'All funds';export function useInvestorsViewModel() { const rows = ref<InvestorRowModel[]>([]); const pipelineDefinitions = ref<PipelineGroupModel[]>([]); const search = ref(''); const statusFilter = ref(ALL_STATUSES); const fundFilter = ref(ALL_FUNDS); const mode = ref<InvestorViewMode>('table'); const loading = ref(false); const error = ref<string | null>(null); const filteredRows = computed(() => rows.value.filter((row) => ( (statusFilter.value === ALL_STATUSES || row.statusLabel === statusFilter.value) && (fundFilter.value === ALL_FUNDS || row.fundLabel === fundFilter.value) && row.investorLabel.toLowerCase().includes(search.value.trim().toLowerCase()) )), ); const pipelineColumns = computed(() => pipelineDefinitions.value.map((group) => ({ ...group, rows: filteredRows.value.filter((row) => row.statusLabel === group.statusLabel), })), ); async function refresh() { loading.value = true; error.value = null; try { const data = await adminService.getInvestors(); rows.value = data.rows; pipelineDefinitions.value = data.pipelineGroups; } catch { error.value = 'Investor data could not be loaded.'; } finally { loading.value = false; } } return { rows, filteredRows, pipelineColumns, search, statusFilter, fundFilter, mode, loading, error, refresh, };}Step 6
Render prepared state with simple Vue components
Visual components receive prepared rows, labels, and arrays. When the service later switches from mock data to SDK/API data, the rendered component should not need a structural rewrite.
<!-- src/app/views/InvestorsView.vue --><section class="flex flex-col gap-5 p-4 md:p-6"> <Button variant="outline" type="button" :disabled="vm.loading" @click="vm.refresh"> <RefreshCw data-icon="inline-start" aria-hidden="true" /> <span>{{ vm.loading ? 'Loading' : 'Refresh' }}</span> </Button> <InvestorTable v-if="vm.mode === 'table'" :rows="vm.filteredRows" /> <PipelineBoard v-else :columns="vm.pipelineColumns" /></section>Custom Component Build Map
| Instruction | Example File | Why It Matters | |
|---|---|---|---|
Ready to build your own component?